Adhesive Collars Pro and Easy for Your Adhesive Horse Shoe
go to the online shopThe Appropriate Adhesive Collar for Your Adhesive Horse Shoe
Not too long ago, adhesive collars in horseshoeing were more of a niche product. The first adhesive collar in our range was the Easy. Even though the Easy adhesive collar still has its fans today, we were never completely satisfied with the gluing and the adhesive horse shoe achieved through adhesive application. For this reason, we further developed the Easy at that time; the result of this development was the Pro adhesive collar.
Since 2019, in addition to the Easy and Pro adhesive collars, we have introduced another alternative in our range: the Wolf Busch® tabs. They have become the most popular gluing product in our selection. However, despite the success of these tabs, our Easy and Pro adhesive collars remain indispensable in our range. A few years ago, we had declared the Easy as a discontinued model, which caused an immediate outcry among its fans.
This once again highlights the importance of having a certain variety of products in our range, ensuring that we have the appropriate product available for (almost) everyone, even when it comes to gluing products.
Easy vs. Pro - Similarities and Differences
Both adhesive collars are now equipped with an improved surface that positively affects the stability of the adhesive bond between the adhesive collar and the horse's hoof.
However, they differ from each other in several other aspects:
- The Easy adhesive collar stands out particularly in terms of price. It is the most affordable adhesive collar in our range.
- The Pro adhesive collar's 11 tabs are already partially adapted to the height and angulation of the horse's hoof. This facilitates the gluing process and reduces the forces exerted on each of the 11 tabs during the shoeing period. Due to the various tab heights, fewer manual adjustments are usually required for each tab compared to the Easy collar.
- The Easy adhesive collar consists of 13 tabs, while the Pro adhesive collar is made up of 11 tabs.
- The Easy adhesive collar is available in a single hardness level. On the other hand, the Pro adhesive collar, like our composite shoes, is available in both a softer and a harder version.
Durability of Gluing Products
The duration of storage directly affects the wear and durability of our sythethic shoes (whether with or without a metal core). We observe a similar effect with adhesive collars, although it is not about wear but rather the flexibility and bendability of the tabs. This means that over time, the adhesive collar becomes slightly stiffer.
Please take these findings into account in your daily work: Make sure to use the oldest gluing products first when working with adhesive collars.
Adhesive Collar Easy and Pro - Photos
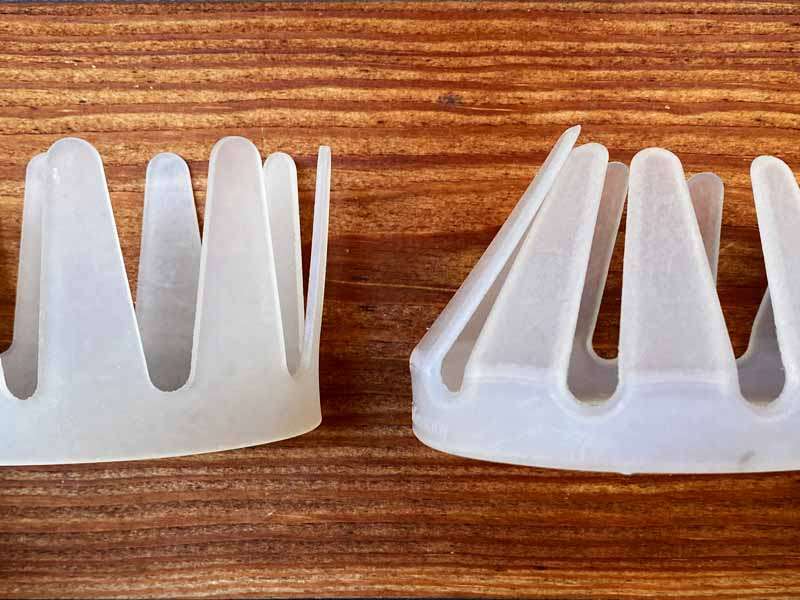
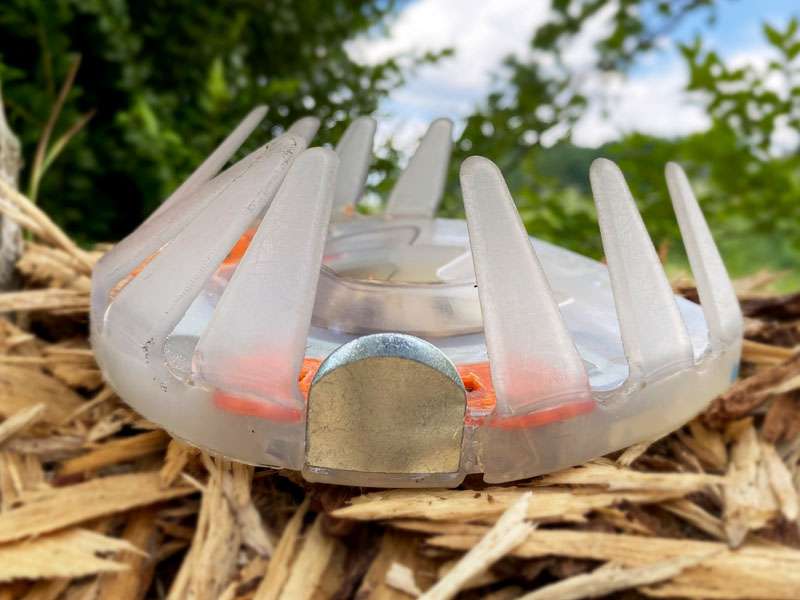
Unlike the Easy adhesive collar, the 11 tabs of the Pro adhesive collar are slightly angled.
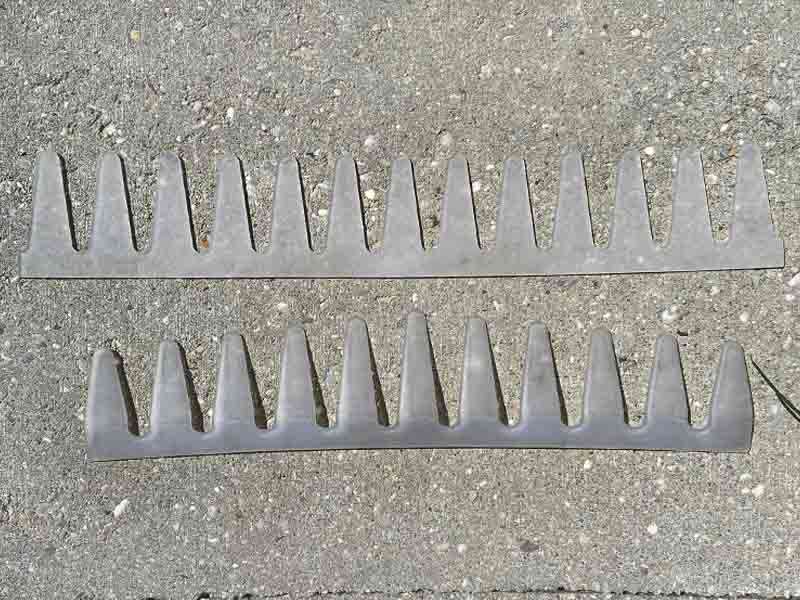
The 13 tabs of the Easy adhesive collar all have the same height, while the 11 tabs of the Pro adhesive collar are adjusted to the shape of the hoof and become shorter towards the heels.

The Easy and Pro adhesive collars are best suited for use in combination with a round or oval urethane shoe.
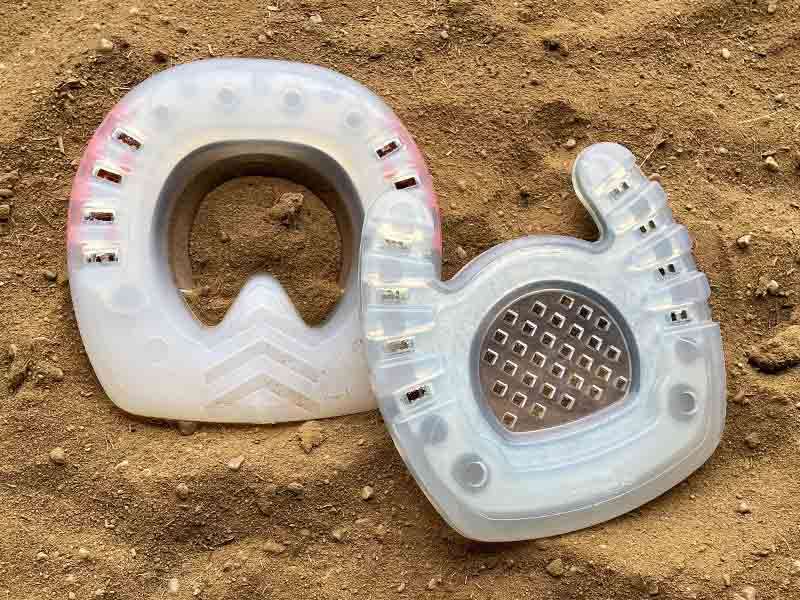
In combination with a shoe featuring a straight or open toe, we recommend using the Wolf Busch® tabs.
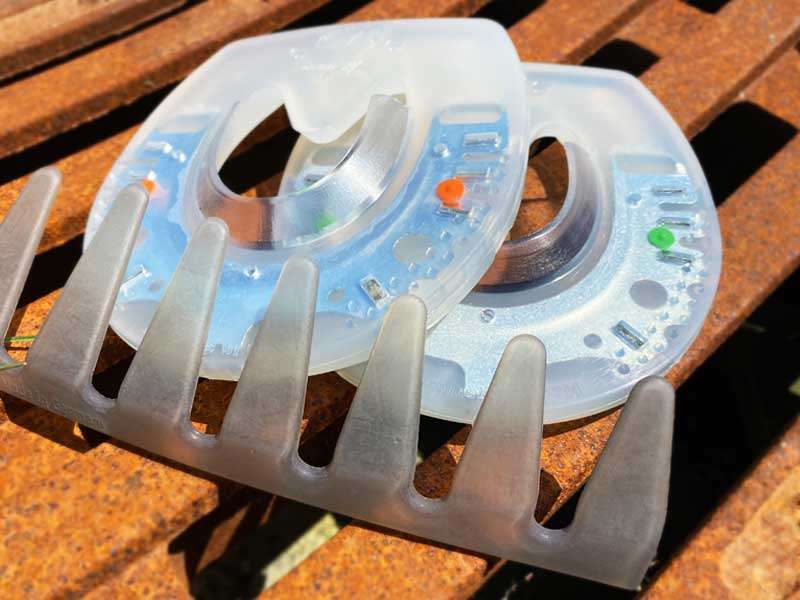
You can bond the Pro Standard to both a Standard shoe and an Extra shoe. The same applies to the Pro Extra.
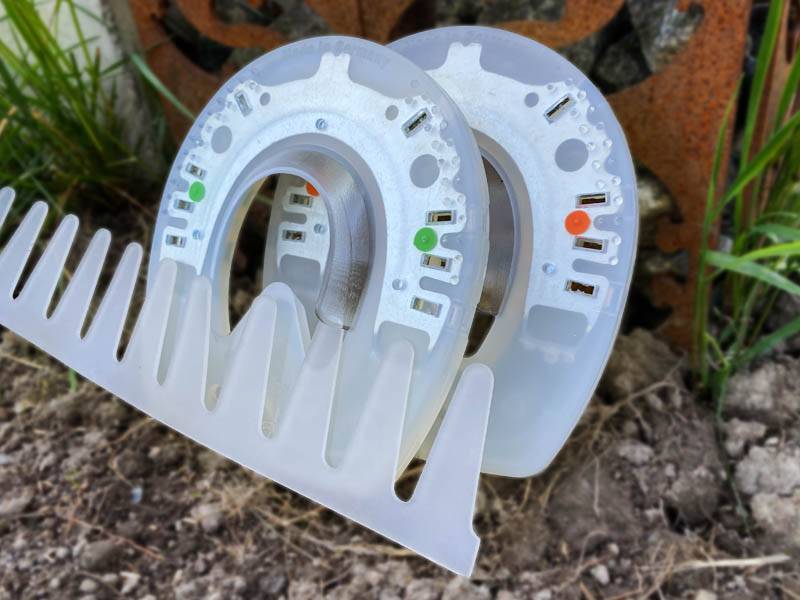
The Easy adhesive collar can also be combined as needed. You can bond it with both a Standard shoe and an Extra shoe.
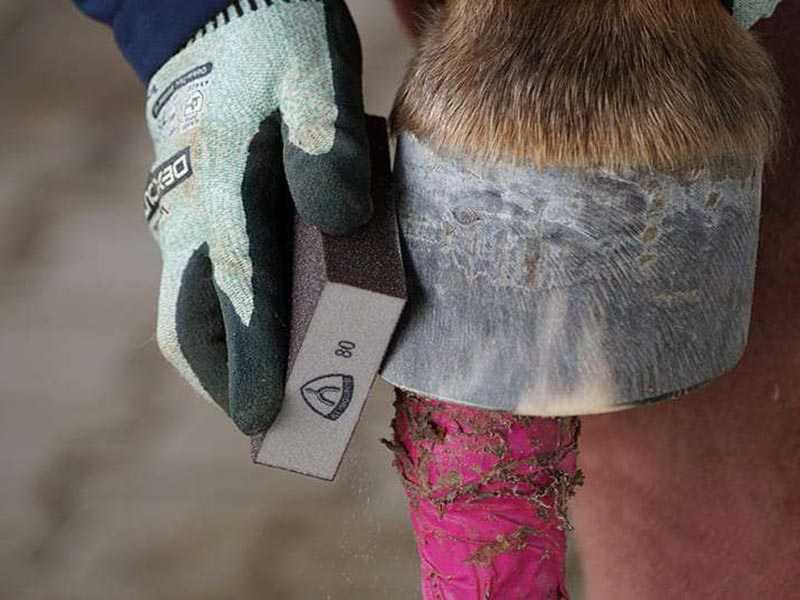
Before applying the adhesive, it is important to roughen the horse's hoof. We recommend using sanding blocks with a grit size of 80 to 120.
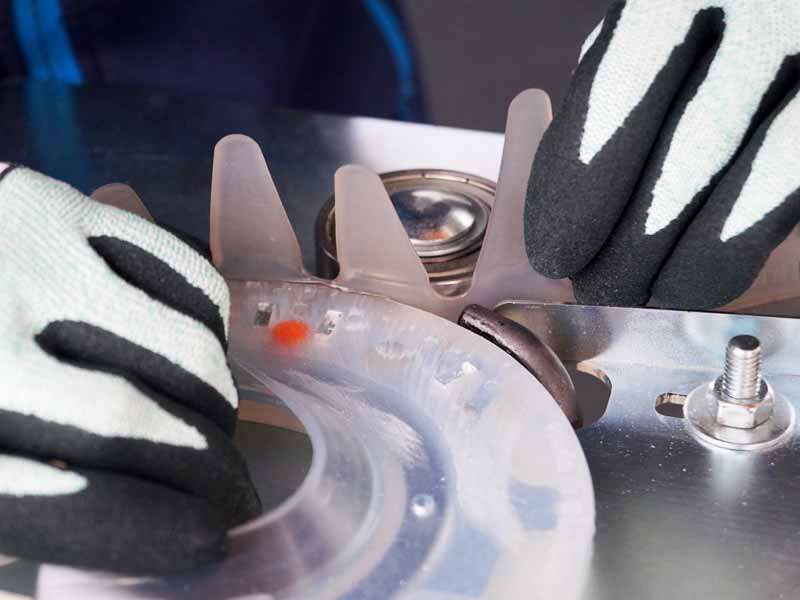
The weld seam is a crucial factor for the success of the glued application of a horse shoe.
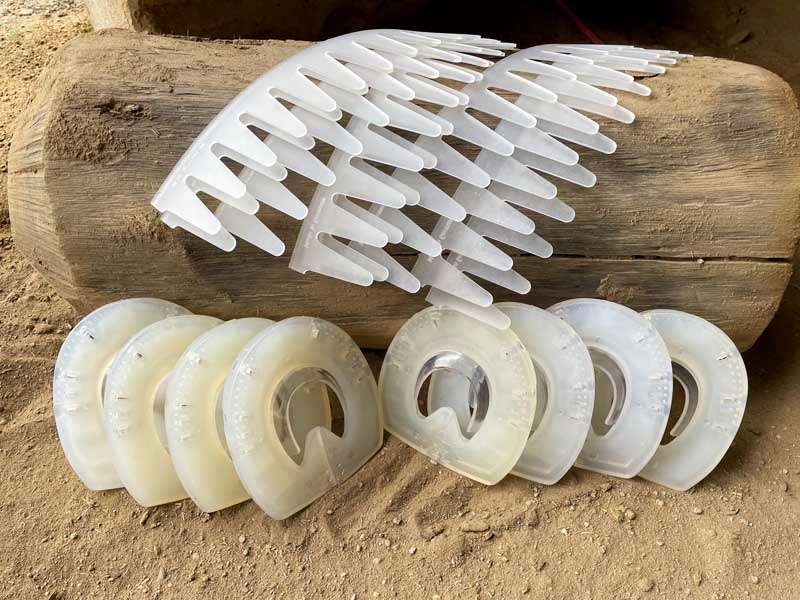
Practice makes perfect, as the saying goes. If you would like to practice welding the shoe and adhesive collar, we recommend our affordable practice kit.
Application and Safety Instructions for Successful Glue-on Shoes - Video
Please refer to our general safety instructions for every use of our products. These instructions are applicable to both the farrier and the rider/horse owner. Additionally, when using gluing products, you must also adhere to the safety instructions provided with the adhesive being used.
Important Aspects for a Successful Glue-On Application:
At first glance, adhesive application may seem like a simple method to apply hoof protection to a horse's hoof. However, upon closer inspection, a successful glued shoe relies on many factors.
1. Barefoot Trimming
The preparation of the bare hoof must be done correctly and carefully, just like with any other shoeing method. It is important that the bearing edge is perfectly leveled after rasping for an optimal fit.
2. The Perfect Match Between Horse Shoe and Adhesive Collar
In general, you can combine our Pro and Easy adhesive collars with (almost) all of our shoe models. The only model currently not suitable for glue-on application is the Arizona model. All other uretahe shoes, whether with or without a metal core, can be used with the Pro and Easy adhesive collars. It doesn't matter if it's a Standard or Extra shoe. Depending on the urethane material of the glue-on shoe being used, you may need to adjust the rolling speed, applied pressure, and possibly the temperature of the heat gun to achieve a stable bond.
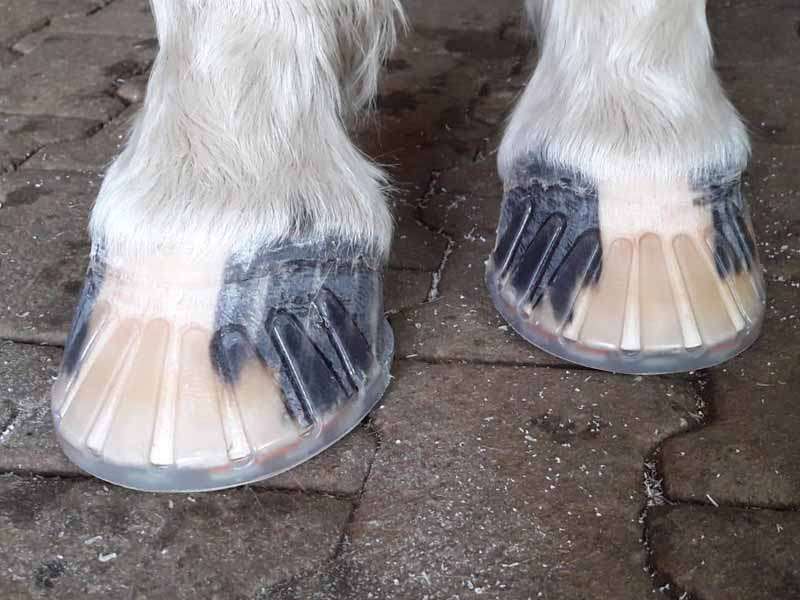
Based on feedback from various users, depending on the shoe shape, we would recommend the following in favor of easier gluing handling:
For round/oval plastic shoes with or without a metal core, we recommend the following:
- Adhesive Collar Easy with 13 tabs
- Adhesive Collar Pro with 11 tabs
- Glue-On Tabs Wolf Busch®
For shoes with a straight toe (STS) or an open toe area, we recommend the following:
- Glue-on Tabs Wolf Busch®
However, the choice of the appropriate glue-on collar for your adhesive shoe is not solely determined by the shape of the urethane shoe.
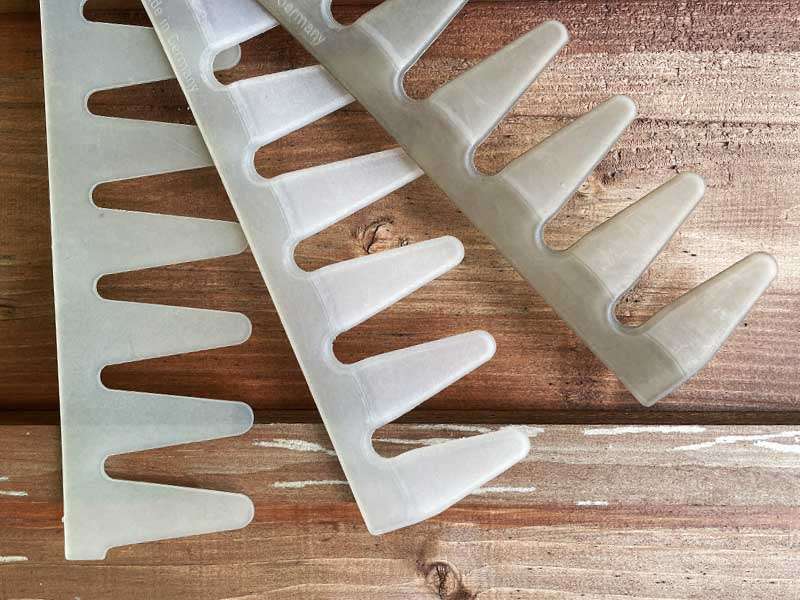
The Easy adhesive collar with 13 tabs is available in a single variant.
The Pro adhesive collar with 11 tabs, like our shoes, is available in two hardness levels. However, the hardness
level of the material has a different impact on an adhesive collar compared to a urethane shoe.
What Determines the Choice of the Appropriate Adhesive Collar?
The slightly softer material of the standard adhesive collar is a bit easier to bend compared to the harder material of the Pro Extra or Easy adhesive collar. In terms of working on the horse's hoof, this means that depending on the hoof shape and temperature, it may be slightly more challenging to bond the two to the hoof wall.
The choice of the appropriate adhesive collar depends on various factors and ultimately rests with the local farrier. However, we would like to provide some guidance here to help with the decision-making process regarding when we would prefer to use each adhesive collar.
Adhesive Collar Easy
- moderate to high summer temperatures
- limited suitability and more difficult handling in case of irregular hoof walls
Adhesive Collar Pro Standard
- low to moderate temperatures
- facilitated application in case of irregular hoof walls due to the angulation of the 11 tabs and the the higher flexibility of the material
Adhesive Collar Pro Extra
- moderate to high summer temperatures
- application possible in case of irregular hoof walls, due to the angulation of the 11 tabs
3. The correct fitting of the shoe
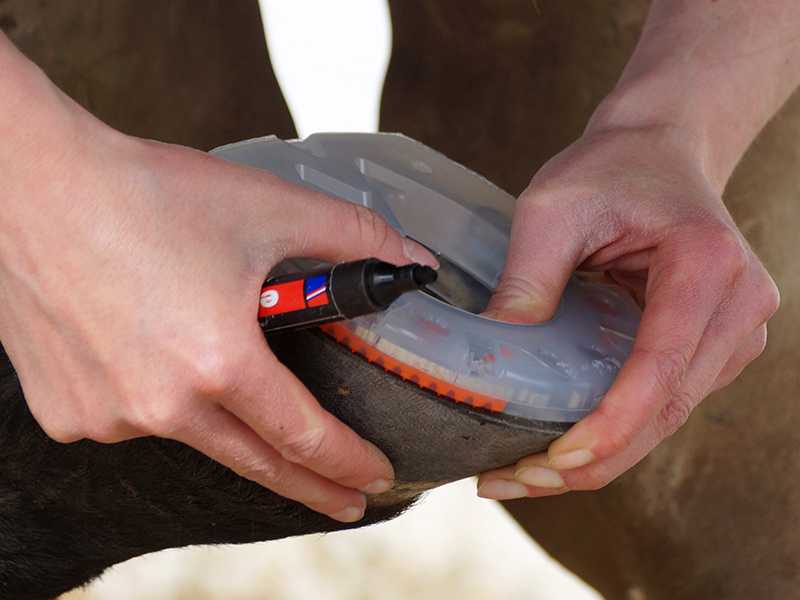
Whether it is a glued or nailed hoof protection, the key to a successful hoof protection is the proper fitting to the horse's hoof. The individual adaptation of our shoes can be quickly accomplished with some craftsmanship skill.
When applying the adhesive hoof protection, ensure that after grinding, the shoe extends approximately 1mm beyond the horse's hoof in the area of the adhesive collar. This excess urethane material is necessary for the weld seam.
Remove all knobs from the horseshoe before welding, using an angle grinder. Please make sure to follow our safety instructions during the process.
4. The Proper Adjustment of Individual Tabs
The 13 tabs of the Easy adhesive collar are all the same height. The 11 tabs of the Pro adhesive collar, on the other hand, are adapted to the shape of the hoof in terms of their height. The tabs in the toe area are therefore higher than the tabs for the rear hoof area.
However, for both adhesive collars, it may be necessary to adjust the height of the tabs to fit the horse's hoof.
Ensure that the tabs are placed only on the hoof wall. If the tabs are later glued onto the coronet band, it can negatively impact the stability of the adhesive bond.
5. Welding
Once the shoe is optimally fitted to the horse's hoof and meets the horse's needs, you can begin the welding process.
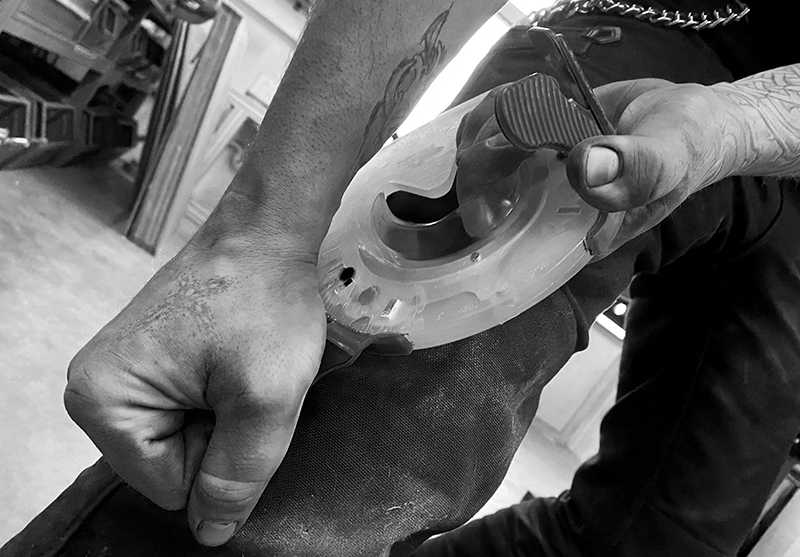
After your weld seam has cooled down, it is important to test its stability using a manual pull test. Apply strong force to the adhesive collar and check for any instability or uneven weld seams, as these can often lead to premature loss of the horse shoe.
6. Final Preparation for the Glued Application
Before starting the gluing process, it is important to roughen the horse's hoof using sandpaper or a sanding block.
After roughening, you should degrease both the horse's hoof and the prepared shoe with a cleaning spray.
When wiping off the cleaning spray from the horse's hoof and shoe, ensure that the towel used does not leave any lint behind. Lint residue can negatively affect the stability of the adhesive bond and lead to premature shoe loss.
7. Choosing the Right Instant Adhesive
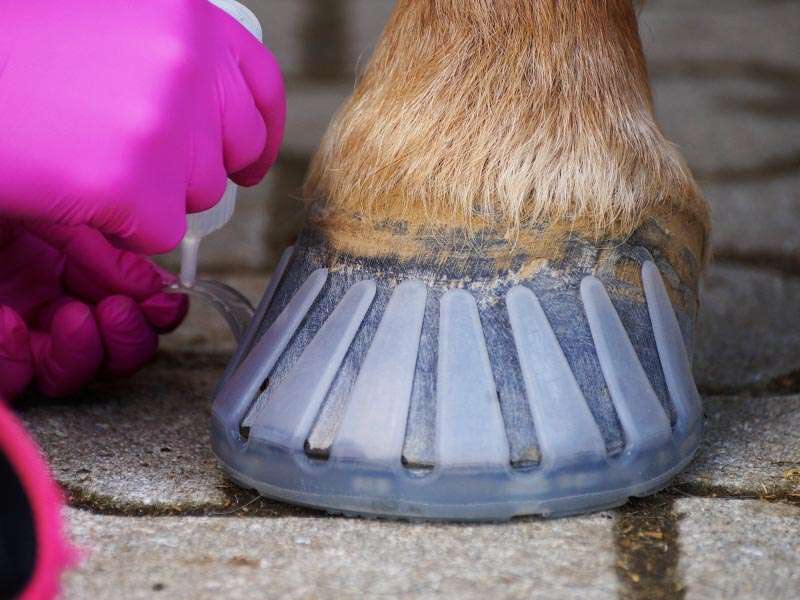
You can purchase various adhesives from us that we generally consider suitable for a glued applicaton of horseshoes.
When choosing the adhesive, you need to take into account the temperature, humidity, and cooperation of the horse. The adhesives have different viscosities depending on the temperature and require varying amounts of time to cure depending on the situation.
Please note that the effectiveness of the instant adhesive and the durability of the adhesive bond typically decrease if the adhesive bottle is left open for too long.
Another important aspect is the humidity or lack of moisture in the summer. Even if your adhesive is generally suitable for summer temperatures, it may simply be too dry. If the adhesive lacks the necessary moisture to activate, it may take longer to cure and/or the instant adhesive may cure faster on the adhesive collar than on the hoof wall.
The adhesives available in our online shop typically reach their full strength after 24 hours. While the horse can be turned out in the pasture or paddock after applying the hoof protection, it is advisable to avoid subjecting the glued horse shoe to excessive stress before reaching full strength.
8. Proper Gluing Technique
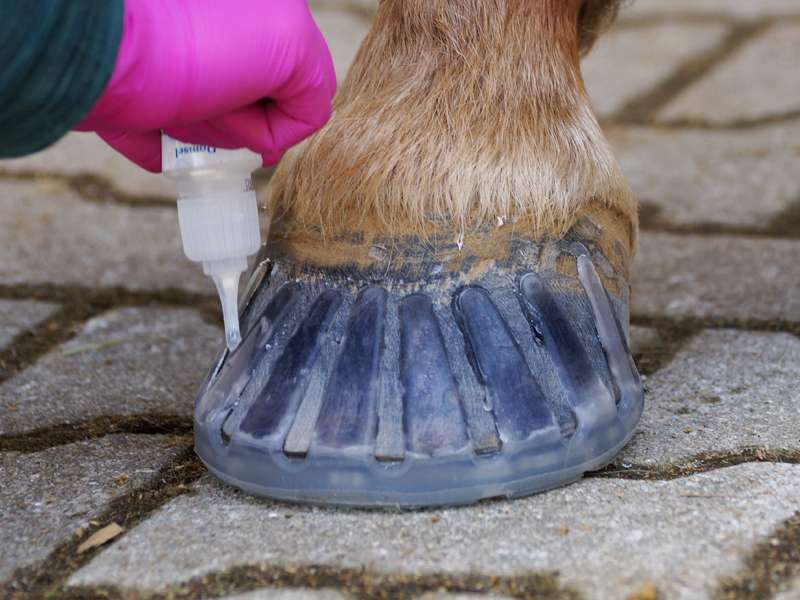
When it comes to gluing a horse shoe, remember that less is more. Apply adhesive around the edges of each tab of the adhesive collar, creating a cross shape and four dots.
Glue each tab individually and remember to seal the tabs with a little bit of adhesive as a finishing touch.
You can find a detailed written step-by-step gluing guide under FAQ → Instructions. Of course, our Customer Service Team is also available to provide further guidance and information.
Glue-on Application Guide
At this point we would like to provide you with the video of our general gluing instructions.
In our video, Shelly Frank uses an open-toed horse shoe in combination with the Wolf Busch tabs.
The general principles for preparing the adhesive collar and gluing it to the horse's hoof also apply when using our Pro and Easy adhesive collars.
Resetting Your Glue-On Horse Shoe
Under the following conditions it is possible to reset a glue-on shoe:
- The horseshoe itself is in good condition and can be reused.
- The weld between the horseshoe and the glue-on collar withstands another tear test.
- The individual tabs of the glue-on collar are not damaged and have no cracks.
Before the shoe can be reset, it is necessary to remove any adhesive residue from the previous shoeing period. This is essential to achieve a stable adhesive bond between the adhesive collar and the horse's hoof.
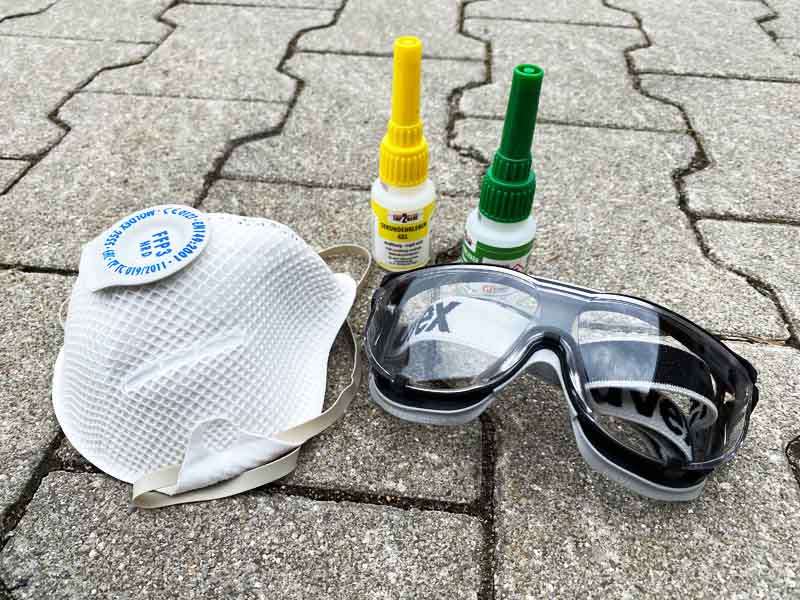
We recommend that you protect yourself with appropriate safety equipment to guard against the grinding dust from the adhesive, as it poses health risks.
Ideally, wear protective goggles, an FFP3 mask, and ensure adequate ventilation during grinding operations.
If the horse shoe is not suitable for a reset, but the tabs are, you can grind off the adhesive collar from the shoe and then weld a new adhesive collar onto it.
Product Features
| Model | Adhesive Collar Pro, Adhesive Collar Easy |
|---|---|
| Brand | Duplo |
| Item number | Adhesive Collar Easy: 000101S Adhesive Collar Pro Standard: 000120S Adhesive Collar Pro Extra: 000110S |
| Function | alternative hoof protection, glue-on shoes, adhesive shoeing, nailless shoeing, gluing products |
| Riding Styles and Disciplines | among others: leisure riding, trail riding, endurance, western riding, dressage, gaited horse riding, baroque riding, ground work, cross-country riding, working equitation |
| Admission for Tournaments | Our shoes are approved for various tournaments. For more information please contact the respective association (e.g. AQHA, DWA, FEIF, FISE, FN, IPZV, OEPS, SVPS). |
| Therapy Shoe | The adhesive collars in combination with a composite or purely urethan horseshoe are also suitable for supportive use in the orthopedic and therapeutic field. We expressly point out that our products do not diagnose or cure any diseases and advise for any use with a therapeutic or orthopedic background to work closely with the hoof specialist or veterinarian on site. |
| Horse Breeds | a.o. Warmblood, Thoroughbred, Quarter Horse, Paint Horse, Haflinger, Icelandic, Arabian, Friesian, Andalusian, Hanoverian |
| Glue-on Application Guide | can be found under FAQ → Instructions |
| Safety Advices | can be found under FAQ → Safety Informationy Please also consider the safety instructions provided by the specific instant adhesive you are using. |
| Made in | Germany |
| Available Sizes | One Size |
| Accessories | adhesives, hoof cleaner, abrasive block, welding device, hot-air gun and reduction nozzle |
| Packaging Unit | The glue-on collars Easy and Pro are sold in pieces. You usually require one collar per hoof. |
| Shipment | within Canada - for worldwide shipments please contact the Duplo Team in Germany |
Tips and Tricks:
Modifying the Adhesive Collar
In addition to adjusting the height of each tab to fit the horse's hoof, it may be necessary to make further adjustments to the adhesive collar.
Modifications in the Toe Area
One of the main differences between the Wolf Busch® variant and our Easy and Pro adhesive collars is that the adhesive collar completely encases the horse's hoof, including the toe area.
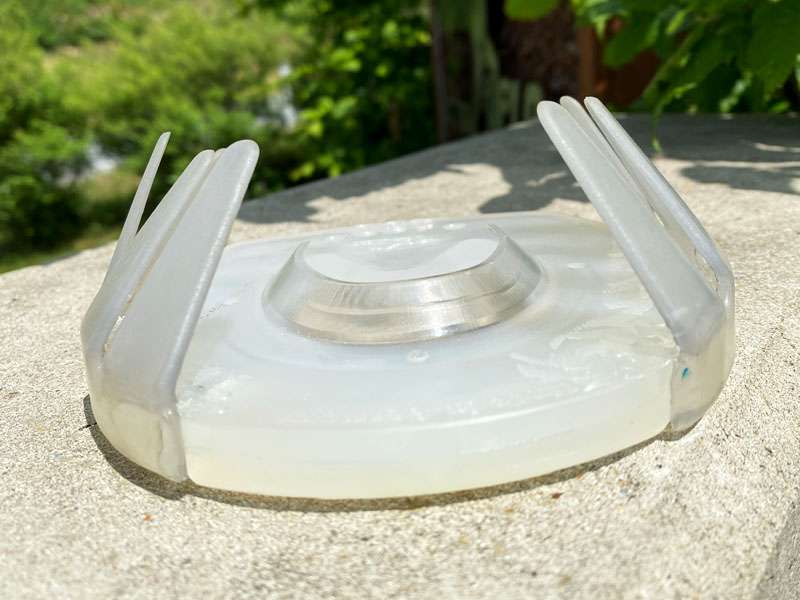
For horses with naturally longer toes, a tendency to stumble, or a need for an earlier breakover point, it can be helpful to divide the adhesive collar and leave the toe area uncovered.
Modifications for Use with Quarter Clips
It is indeed possible to use a composite shoe with quarter clips for your glue-on shoe.
To do so, you simply need to cut the adhesive collar into several logical pieces and position the tabs accordingly. In principle, you can use each tab of the adhesive collar individually.
Please note that this also applies if you grind down the quarter clips, as it will not be possible to create a weld in the area where the quarter clips have been removed.
Do-it-Yourself:
Bend the adhesive tabs of the Easy collar yourself
The biggest advantage of the Pro adhesive collar compared to the Easy is the angulation of its tabs, which facilitates the gluing process and reduces the forces acting on each individual tab.
However, if you are using the cost-effective Easy adhesive collar, you have the option to create this effect yourself.
Simply heat the tabs of the finished adhesive hoof protection slightly. Place the shoe on the adhesive collar, apply weight to it (e.g., with a hammer), and allow it to cool while resting on the collar.
By allowing the individual tabs to cool and solidify in a bent state, you can achieve a similar effect to the angulation of the tabs in the Pro adhesive collar.


